
BlueSnap makes it easy to move your entire merchant portfolio to our system through a guided migration process. We work with you to securely validate merchant information, process migration records, and guide merchants through any required verification steps.
Choose a Migration Approach
BlueSnap supports different ways to migrate an existing merchant portfolio. Your BlueSnap implementation team will help you choose the right approach depends on your onboarding model, the merchant data you already have, and desired merchant experience.
| Migration Approach | Best When... | How It Works |
|---|---|---|
| API-based Migration | Your platform is building API Application onboarding and wants to use the same process for migrated merchants and future merchants. | Submit existing merchant data through the Application API flow. Follow the same onboarding flow you use for new merchant applications and then refer to this guide for data preparation, merchant consent, document requests, and approval tracking. |
| White-labeled Hosted Application Prefill (Coming Soon!) | Your platform wants merchants to review, complete, and submit their own application in a hosted experience. | Your platform pre-fills available merchant data before the merchant completes and submits the application. Follow the same onboarding flow you use for new merchant applications and then refer to this guide for data preparation, merchant consent, document requests, and approval tracking. |
| Template-based Migration | Your platform wants to migrate merchants through a structured file-based process. | Complete a regional migration template, submit it to BlueSnap, and resolve validation or verification requests. Refer to the rest of this guide for the full template-based migration process. |
Template-Based Migration Process
Template-based merchant portfolio migration has seven main steps:
- Confirm your migration plan
- Prepare merchant data
- Collect merchant consent
- Complete the migration template
- Upload the template
- Resolve validation errors and document requests
- Track merchant approval
1. Confirm Your Migration Plan
Before starting a portfolio migration, confirm your migration approach with BlueSnap.
Your platform may not have every field required for BlueSnap merchant verification, so you need a plan to collect missing information from merchants. Even if you already have the required application fields, you still need a plan to collect each merchant’s consent, consent date, and IP address.
In this stage, the BlueSnap implementation team will help you with planning your entire merchant portfolio migration journey and will also provide access to a BlueSnap Sandbox Portal account configured for your migration.
2. Prepare Merchant Data
Before you submit merchants for migration, compare the merchant data in your system with the fields required by BlueSnap. Your field names may not match BlueSnap field names exactly, in which case you need to map your internal fields to the corresponding BlueSnap fields.
Before filling out the final migration template, create a field mapping worksheet. Your worksheet should help answer:
- Which BlueSnap fields are required?
- Which internal platform field maps to each BlueSnap field?
- Which source system contains the data?
- Does the data need to be reformatted?
- Is the field missing?
- Does the merchant need to provide or confirm the value?
This helps prevent the migration template from becoming the first place where missing or mismatched data is discovered.
3. Collect Merchant Consent
Before you submit merchants for migration, each merchant must agree to the applicable BlueSnap terms and pricing. You must capture:
- Merchant Terms & Conditions
- Merchant Agreement
- Pricing agreement
- Date of consent
- Merchant’s IP address
Most platforms collect this consent by email or through their own platform experience before switching payment providers. For example, you can send the following language in an email and require that each merchant checks a box to indicate their consent:
Email Template
I have read and agree to the Merchant Application Terms, Merchant Agreement, and Pricing Agreement [link to agreed-upon pricing between yourselves and BlueSnap].
4. Complete the Migration Template
For template-based migration, work with your BlueSnap implementation team to confirm that you have access to the BlueSnap Sandbox Portal account configured for merchant portfolio migration and that the Merchant Onboarding Tool is enabled.
Download the applicable regional template below and add your merchant information. Each template includes the required fields for that region. The fields follow the same requirements as the corresponding New Application API request.
Make sure the data is complete, mapped correctly, and formatted according to the template requirements before uploading. Missing, invalid, or incorrectly mapped information can delay merchant approval.
5. Upload the Template
After you complete the template and collect merchant consent, upload the file in the BlueSnap Sandbox Portal account configured for your migration.
-
Log in to the BlueSnap Sandbox Portal account provided or confirmed by your BlueSnap implementation team.
-
Go to Settings > Merchant Onboarding Tool.
-
Enter your API password.
-
Click Select File and choose the completed template.
-
Select Validate and Upload.
A standard self-created sandbox account or your production portal account may not include access to the Merchant Onboarding Tool.
6. Resolve Validation Errors and Document Requests
After the file is uploaded, BlueSnap displays a validation summary. If one or more records fail validation, the system generates a report. Fix the errors and re-upload the corrected file.
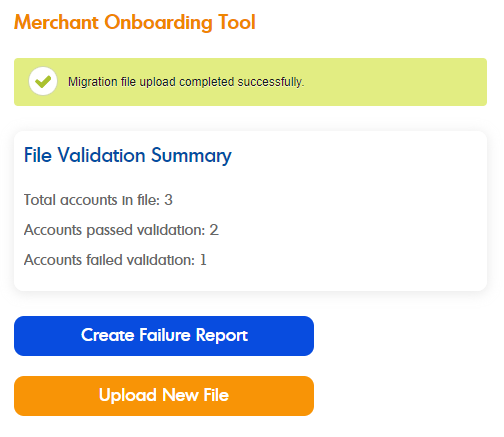
Common validation issues include:
- Missing required fields.
- Incorrect field formatting.
- Invalid regional values.
- Incomplete consent information.
- Field values mapped to the wrong template fields.
- Business or owner information that does not match the required format.
Migration does not guarantee approval!
Each merchant must still pass BlueSnap verification before they can process payments. Some merchants may need to provide additional information or documents before they are approved.
Document Requests
Some merchants may require additional information or documents.
The document request process depends on your platform setup. In some cases, BlueSnap may contact the merchant directly. In other cases, your platform collects the requested documents from merchants and submits them through the Document Upload API or the Partner Portal.
7. Track Merchant Approval
BlueSnap notifies you as merchants move through verification. Depending on your setup, notifications may include:
- Merchant onboarding webhooks
- Status updates in the Partner Portal
Depending on your document request preferences, your merchants may also receive approval notification emails.
After Approval
After a merchant is approved, BlueSnap assigns the merchant an account. Your platform can then generate the merchant’s production API credentials and use those credentials to process payments on behalf of that merchant.