
Learn how to accept Apple Pay on your website or iOS app. If you still have questions after reading this guide, check out our FAQs.
Apple Pay is a simple, secure payment experience, allowing shoppers to purchase with credit and debit cards linked to their supported Apple devices. Apple Pay is accessible from newer versions of Safari and iOS, allowing shoppers to buy both from your website or native iOS app.
Notes
- If you want to integrate to both Apple Pay and Google Pay, check out our Payment Request Button solution.
- Apple Pay is supported for both first-time transactions and recurring transactions. Review the highlighted sections for detailed information.
Supported Merchant Countries
Merchants domiciled in the following countries can accept Apple Pay.
Supported Shopper Countries and Issuers
Shoppers whose issuing banks are located on this list are eligible to purchase with Apple Pay.
Website Implementation
This section covers how to implement Apple Pay in your website for our API solutions. If you're using our BuyNow Hosted pages, visit our Help & Support.
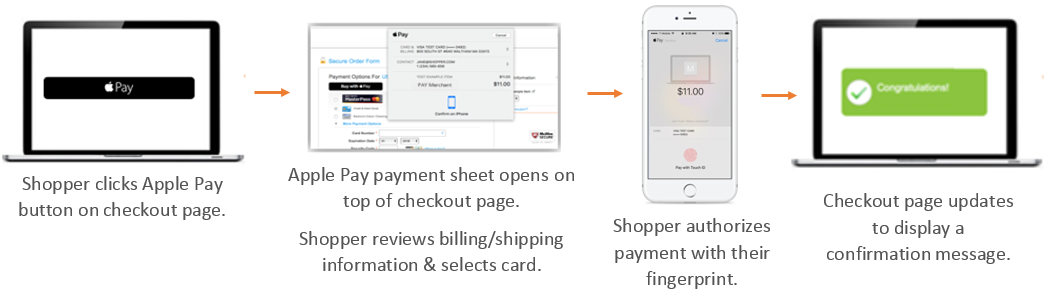
The shopper experience with Apple Pay on the web
Requirements
Shopper device requirements
| Purchasing on an iOS device | Purchasing on a Mac |
|---|---|
| Safari must be open on an Apple Pay-enabled iPhone. | Safari must be open on a:
|
Apple Pay requirements
Comply with Apple's Acceptable Use Guidelines to ensure you're properly representing Apple Pay on your website.
Server requirements
- All pages that include Apple Pay must be served over HTTPS.
- Your domain must have a valid SSL certificate.
Domain verification
You'll need to the register all web domains that will display the Apple Pay button. See Step 1 to learn how.
Accepting donations?
If you're accepting donations, Apple requires that you register with Benevity before you begin implementing Apple Pay in your website.
Step 1: Verify your domain
You'll need to register all your domains that will be displaying the Apple Pay button, including both top-level domains (e.g. bluesnap.com) and sub-domains (e.g. store.bluesnap.com).
1.1: Host the domain verification file on your server
- In your BlueSnap Merchant Portal, go to Integrations > Apple Pay, and click Download verification file. The file automatically begins downloading.
- Host the file at
/.well-known/apple-developer-merchantid-domain-associationon your domain(s) that will display the Apple Pay button.
1.2: Tell BlueSnap where you're hosting the file
You'll need to tell BlueSnap where you're hosting the file using either the BlueSnap Merchant Portal or the Onboarding API.
Option 1: BlueSnap Merchant Portal
- In your BlueSnap Merchant Portal, go to Integrations > Apple Pay, and enter your domain name in the New Domain field. Do not include
https://. - Click the (+) Add button.
- When you're done, click Submit.
Option 2: Onboarding API
Using the Onboard Apple Pay API, send a POST request to services/2/wallets/onboarding as shown in the example below.
Note: Do not include https:// when entering your domain name(s).
Sample request:
{
    "walletType": "APPLE_PAY",
    "applePay": {
    	"domains" : ["example.com", "mystore.example.com", "bluesnap.com"]
    }
}
<wallet xmlns="http://ws.plimus.com">
<wallet-type>APPLE_PAY</wallet-type>
<apple-pay>
<domain>example.com</domain>
<domain>mystore.example.com</domain>
<domain>bluesnap.com</domain>
</apple-pay>
</wallet>A successful response is 201 Created and includes a location header with an Onboarding ID. You may use this ID later to retrieve your registered domain details.
Sample response:
HTTP/ 1.1 201 Created
Location: https://sandbox.bluesnap.com/services/2/wallets/onboarding/385
Note: To update your onboarding information in the future, such as to unregister a verified domain or to add a new domain, use the Update Apple Pay Onboarding Information request.
Step 2: Add and display the Apple Pay button
This section covers how to add the Apple Pay button to your site, and how to detect if the shopper is using a compatible device to determine if the button should be displayed.
Apple Pay requirements
On all pages where the shopper is presented with the Apple Pay button, you're required to adhere to the Apple Pay Acceptable Use Guidelines and Apple Pay on the Web Human Interface Guidelines.
2.1: Add the Apple Pay button to your site
Begin by adding a hidden Apple Pay button to your site. Note that Safari now comes with built-in Apple Pay images, which can be accessed using -webkit-named-image. The following black Apple Pay button with white text can be created using this feature.

Adding the Apple Pay button:
<button id="apple-pay-button"></button>The following CSS renders the above Apple Pay button. There are many ways to style the button. Refer to Apple's documentation for code samples.
#apple-pay-button {
    -webkit-appearance: -apple-pay-button;
    -apple-pay-button-type: plain;
    visibility: hidden; /* button is hidden by default */
    display: inline-block;
    width: 200px;
    min-height: 30px;
    border: 1px solid black;
    background-image: -webkit-named-image(apple-pay-logo-white);
    background-size: 100% calc(60% + 2px);
    background-repeat: no-repeat;
    background-color: black;
    background-position: 50% 50%;
    border-radius: 5px;
    padding: 0px;
    margin: 5px auto;
}
2.2: Display the Apple Pay button on a compatible device
Detect the shopper's browser and device capabilities to determine if the Apple Pay button should be displayed. Check that window.ApplePaySession class exists in the browser (this class manages the Apple Pay payment process in your website). Call its canMakePayments method to perform a basic hardware check to see if the shopper's device is capable of purchasing with Apple Pay.
if (window.ApplePaySession && ApplePaySession.canMakePayments()) {
    // Device supports Apple Pay
    // Show Apple Pay button...
}
If you want to default to Apple Pay during your checkout flow, or if you want to add Apple Pay buttons to your product detail page, you can use the canMakePaymentsWithActiveCard method. This asynchronous call detects that the shopper's device supports Apple Pay and that there is at least one card provisioned in their account. If checking Apple Pay compatibility at any other point, use canMakePayments instead.
Call canMakePaymentsWithActiveCard with a string containing your BlueSnap Merchant ID and the verified domain that will display the Apple Pay button, in the format: "{BlueSnap Merchant ID}-{Domain}". For example: "123456-test.bluesnap.com".
if (window.ApplePaySession) {
    var merchantID = '123456'; // your BlueSnap Merchant ID;
    var domain = 'test.bluesnap.com'; // your domain that will display Apple Pay button

    var promise = ApplePaySession.canMakePaymentsWithActiveCard(
        merchantID + '-' + domain
    );
    promise.then(function (canMakePaymentsWithActiveCard) {
        if (canMakePaymentsWithActiveCard) {
            // Device supports Apple Pay & user has at least 1 provisioned card
            // Show Apple Pay button...
        }
    });
}
Step 3: Create an ApplePaySession
A new ApplePaySession instance should be created every time the Apple Pay button is clicked/tapped.
We'll begin by adding an event listener on the button that calls applePayClicked when the button is clicked. This callback function is where the majority of our Apple Pay implementation takes place.
document.getElementById('apple-pay-button').addEventListener('click', applePayClicked);To begin, do the following within applePayClicked:
-
Create a payment request object (an object that contains all the information needed to display the payment sheet).
-
Create a new
ApplePaySessioninstance.
For the payment request object, BlueSnap requires the following information to complete a transaction, in addition to Apple Pay's requirements:
Payment API | Extended Payment API |
|---|---|
|
|
Note
You do not need to enter the actual information, but rather specify the parameters that you want to pull from the shopper. For example, if you want to request the shopper's billing address, you specify:
requiredBillingContactFields: [ 'postalAddress']
The following is an example of a new ApplePaySession creation:
function applePayClicked() {
  var request = {
    countryCode: 'US',
    currencyCode: 'USD',
    total: { label: 'Your Label', amount: '10.00', type: 'final' },
    supportedNetworks:[ 'amex', 'discover', 'jcb', 'masterCard', 'visa' ],
    merchantCapabilities: [ 'supports3DS' ],
    requiredBillingContactFields: [ 'postalAddress', 'name' ],
    requiredShippingContactFields: [ 'postalAddress', 'email', 'phone' ]
  };
  var session = new ApplePaySession(2, request);
  // continued below
}Note
The
labelshould be a short, localized description of the line item. Certain displays can truncate the label so we recommend a short label.
When creating a new ApplePaySession instance, a JavaScript exception is thrown if any of the following occur:
- Any Apple Pay JavaScript API is called from an unsecured page.
- You pass an invalid payment request. Payment requests are invalid if they contain missing, unknown, or invalid properties, or if they have a negative total.
Step 4: Set up the onvalidatemerchant callback
Setting up event handlers
Apple's documentation provides a list of events for which you may set up event handlers. We'll go over how to set up the
onvalidatemerchantandonpaymentauthorizedevent handlers. You may set up additional event handlers if you wish.
The callback function onvalidatemerchant is automatically called with an event object when the payment sheet is displayed. Merchant validation is initiated so Apple can verify your eligibility to accept Apple Pay on your website.
The following steps outline the flow for onvalidatemerchant:
| Client-side: | Server-side: |
|---|---|
|
⟵Go to Step 7 on client-side |
function applePayClicked() {
  // continued from above
  session.onvalidatemerchant = function(event) {
    var validationURL = event.validationURL;
    // send validationURL to your server...


    // ...return base64 decoded token
  var decodedToken = {base64 decoded token};
  session.completeMerchantValidation(JSON.parse(decodedToken)); //to abort the session, use session.abort()
  };
  // continued below
}
When called, completeMerchantValidation completes the merchant validation process. The payment sheet updates to request the shopper's authorization.
Create Wallet API call
The Create Wallet request is done as part of the merchant validation process. Perform this call after you've sent the URL from event.validationURL to your server.
The Create Wallet request should be sent to /services/2/wallets, and should contain the following properties:
- Wallet Type — value is APPLE_PAY.
- Validation URL — value extracted from
event.validationURL. - Domain Name — The name of your domain that you verified in Step 1.
- Display Name — (optional) The name of your store. On certain models of MacBook Pro, the system displays this name to the user in the Touch Bar. The value is up to 65 UTF-8 characters. If this is not included, the system displays your BlueSnap-registered Merchant Name. We recommend that you include this information to avoid confusion for your customers.
Sample Create Wallet requests:
{
  "walletType": "APPLE_PAY",
  "validationUrl": "https://apple-pay-gateway-cert.apple.com/paymentservices/startSession",
  "domainName": "merchant.com",
  "displayName": "My Store"
}
<wallet xmlns="http://ws.plimus.com">
<wallet-type>APPLE_PAY</wallet-type>
<validation-url>https://apple-pay-gateway-cert.apple.com/paymentservices/startSession</validation-url>
<domain-name>merchant.com</domain-name>
<display-name>My store</display-name>
</wallet>A successful response contains the Wallet Token (a base64 encoded string).
Sample Create Wallet response:
{
    "walletType": "APPLE_PAY",
    "walletToken":"ImRhdGEiOiJuY1AvRitIUy8zeG5ISk1pSm9RbXhCMFd"
}
<wallet xmlns="http://ws.plimus.com">
<wallet-type>APPLE_PAY</wallet-type>
<wallet-token>ImRhdGEiOiJuY1AvRitIUy8zeG5ISk1pSm9RbXhCMFd</wallet-token>
</wallet>Step 5: Set up the onpaymentauthorized callback
The callback function onpaymentauthorized is automatically called with an event object when the shopper has authorized the payment (typically via Touch ID).
The following steps outline the flow for onpaymentauthorized:
Note
In Steps 1-4 below, we use the term "payment token" to refer to payment information – the entire
event.paymentobject. Be sure to include the entireevent.paymentobject when prompted, not just thetokenportion ofevent.payment.
| Client-side: | Server-side: |
|---|---|
|
|
function applePayClicked() {
  // continued from above
  session.onpaymentauthorized = function(event) {
    var paymentToken = event.payment;
    // send paymentToken to server...


    // ...return a status to completePayment & direct to appropriate page
    session.completePayment(ApplePaySession.STATUS_SUCCESS); //or pass another valid status code - see below
    window.location.href = "/success.html";
    };
  // continued below
}Supported status codes for completePayment
For a list of supported status codes for the
completePaymentmethod, click here.
Step 6: Show the payment sheet
After you've added all your event handlers, call your session's begin method to show the payment sheet to the shopper. Note that if the session isn’t explicitly requested by the customer (i.e. inside a click event), the begin method throws a JavaScript exception.
function applePayClicked() {
  // continued from above
  session.begin();
}
After the begin method is called, your session's onvalidatemerchant callback function is called. The other callback functions are called when their corresponding events are triggered as the shopper proceeds through checkout.
Testing in Sandbox
Testing device(s)
Make sure you're testing on a compatible device.
Note: To test the entire Apple Pay flow, we recommend you test only on real devices. A simulator may be unable to process the transaction.
Device region
To provision test cards on your device, you'll need to make sure that your device’s region is set to a country that supports Apple Pay. Currently, Apple supports testing in the countries listed here.
Note: To test Amex cards for Apple Pay, your device region must be set to the United States.
iCloud account credentials
Contact Merchant Support to have Apple Pay testing enabled on your account. We'll provide you with credentials for an iCloud account that can be used for testing.
Note: Each testing device (i.e. MacBook, iPhone, Apple Watch) must be logged in to this iCloud account. To learn about how to connect Apple Devices with Handoff, visit Apple's Support website.
Test cards
The following cards may be used to test Apple Pay transactions.
| Card Type | Card Number | Exp. Date | CVV Code |
|---|---|---|---|
| Amex1 | 37272 79248 51007 | 12/2028 | 1111 |
| Discover | 6011 0009 9446 2780 | 01/2030 | 111 |
| MasterCard | 5204 2452 5046 0049 | 01/2030 | 111 |
| Visa | 4622 9431 2318 9285 | 12/2028 | 096 |
1 Device region must be set to United States to test Amex.
Note:
Additional test cards are available on the Apple website.
Adding a test card to your Apple Pay wallet
- On your testing iOS device, open the Settings app and tap iCloud at the top. If you're signed in, tap Sign Out at the bottom.
- Log in using the iCloud credentials that you received from BlueSnap.
- Tap Back to go back to the first page of the Settings app.
- Tap Wallet & Apple Pay.
- Tap Add Credit or Debit Card. You'll be prompted to photograph your card. Tap Enter Card Details Manually instead.
- Enter one of the test cards listed above.
iOS App Implementation
Implement Apple Pay in your iOS app using our iOS SDK to allow shoppers to purchase physical items (such as groceries and clothing) or services (such as gym memberships and hotel reservations).
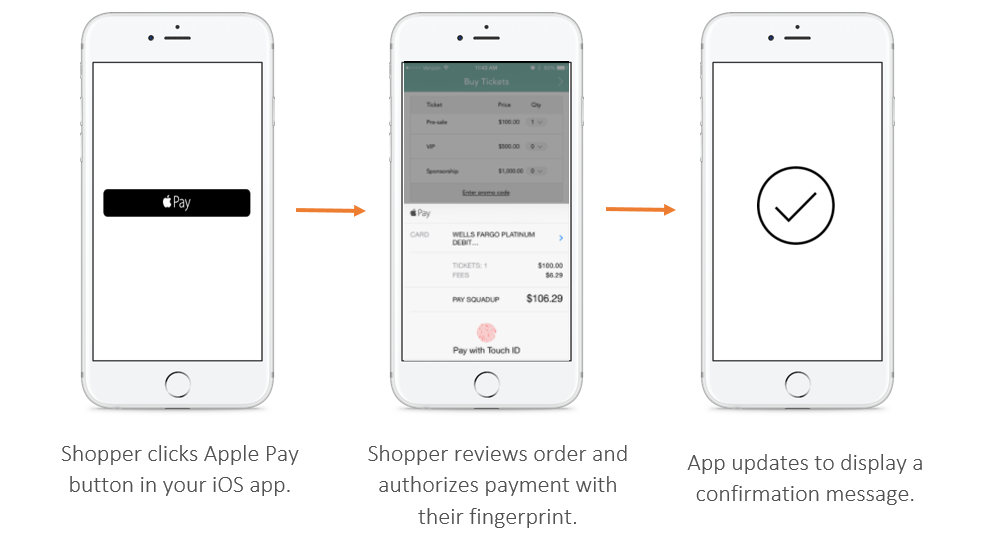
The shopper experience with Apple Pay in iOS apps
Requirements
Shopper device requirements
The shopper must be using an iOS device (iPhone, iPad Air, or iPad mini ) running iOS 8.1 or later to be eligible to purchase with Apple Pay in your app.
Configuration requirements
Apple Developer Account
You'll need an Apple Developer Account and a membership in the iOS Developer Program. If you need to become a member, you can get started here.
Mac with Xcode installed
You'll need a Mac with Xcode 6.1 or newer installed. To install or upgrade Xcode, visit the Mac App Store.
New Apple Pay certificate
To encrypt outgoing payment information, you'll need to create a certificate that you'll upload to your BlueSnap Merchant Portal. Steps 1 and 2 walk you through the process.
Apple Pay requirements
Comply with Apple Pay Identity Guidelines and iOS Human Interface Guidelines to ensure you're properly representing Apple Pay in your iOS app.
Accepting donations?
If you're accepting donations, Apple requires that you register with Benevity before you begin implementing Apple Pay in your iOS app.
Apple Pay vs. In-App Purchases
It's necessary to understand the difference between Apple Pay and In-App Purchase. Use Apple Pay within apps to sell physical goods (such as groceries, clothing, and appliances), or for services (such as club memberships, hotel reservations, and event tickets).
Use In-App purchases to sell virtual goods (such as premium app content and subscriptions for digital content). See Apple's In-App Purchase for more information.
Apple Pay Developer Guide
This guide is designed to work in tandem with the Apple Pay Developer Guide.
Step 1: Register Apple Merchant IDs
Follow these steps to obtain Apple Merchant IDs for sandbox and production.
- From the Apple Developer website, go to the Registering a Merchant ID page.
- Fill out the form by entering a description and an identifier for each environment. We recommend indicating the relevant environment in each description (such as "Apple Merchant ID for sandbox" and "Apple Merchant ID for production").
Note: Your descriptions are for your own records and may be changed in the future. Your identifiers (Merchant IDs) must be unique and cannot be changed later. You'll use your Merchant IDs when developing your app.
Step 2: Create a new Apple Pay certificate
For both your BlueSnap sandbox and production accounts, you'll need to generate a certificate with Apple and upload it to your BlueSnap Merchant Portal in order to encrypt outgoing payment information.
Complete these steps for both your BlueSnap sandbox and production accounts:
- Download the CSR (certificate signing request) file from BlueSnap.
- Using this CSR, generate a certificate with Apple.
- Upload the new Apple certificate to BlueSnap.
2.1 Download the CSR file from BlueSnap
-
In your BlueSnap Merchant Portal, go to Integrations > Apple Pay.
-
In the iOS Applications section, click Download certificate signing request, and the file is automatically downloaded.
2.2 Generate certificate with Apple
- In your Apple Developer Site, go to the Add iOS Certificate page.
- From the options, select Apple Pay Certificate, and click Continue.
- From the dropdown, select the relevant Merchant ID and continue on.
- The next page explains that you may obtain a CSR from your Payment Provider (you obtained this from Step 2.1). The page also explains that you may create one manually — Do not create your own because it will not work. You need to use the CSR obtained from BlueSnap. Ignore the instructions at the bottom of the page and continue.
- You'll be prompted to upload the
.certSigningRequestfile. Select the file you downloaded from BlueSnap in Step 2.1 and continue. - After the success page is displayed, you'll have the option to download your certificate. Do that.
2.3 Upload certificate to BlueSnap
- Go back to Integrations > Apple Pay in your BlueSnap Merchant Portal.
- In the iOS Applications section, click Choose a file, and select the certificate you obtained from Apple.
- Once the certificate has uploaded, click Submit.
Step 3: Configure Xcode
To enable Apple Pay for your app in Xcode, follow these steps:
- In Xcode, open your project settings, and open the Capabilities pane.
- In the Apple Pay row, enable the switch to ON.
- Select the Merchant IDs that you created in Step 1.
Note: Make sure that the selected Merchant IDs are the same identifiers that you used when uploading the Apple certificates to your BlueSnap Merchant Portal in Step 2.

iOS SDK installation and usage
The SDK and a demo app are available on GitHub. See the readme file for detailed usage instructions.
Testing in Sandbox
Testing device(s)
Make sure you're testing on a compatible device.
Note: To test the entire Apple Pay flow, we recommend you test only on real devices. A simulator may be unable to process the transaction.
Device region
To provision test cards on your device, you'll need to make sure that your device’s region is set to a country that supports Apple Pay. Currently, Apple supports testing in the countries listed here.
Note: To test Amex cards for Apple Pay, your device region must be set to United States.
iTunes Connect sandbox tester account
You'll need to create a sandbox tester account. We walk you through the process in Creating a sandbox tester account.
Test cards
The following cards may be used to test Apple Pay transactions.
| Card Type | Card Number | Exp. Date | CVV Code |
|---|---|---|---|
| Amex1 | 349956959041362 | 12/2022 | 1111 |
| Discover | 6011000994462780 | 11/2024 | 111 |
| MasterCard | 5204247750001471 | 11/2022 | 111 |
| Visa | 4761349750010326 | 12/2025 | 747 |
1 Device region must be set to United States to test Amex.
Note:
Additional test cards are available on the Apple website.
Creating a sandbox tester account
- Sign in to iTunes Connect.
- On the homepage, click Users and Roles.
- Click Sandbox Testers.
- Next to Testers, click ⊕ to create a new test user.
- Complete the Tester Information form, and click Save when you're finished.
Adding a test card to your Apple Pay wallet
- On your testing iOS device, open the Settings app and tap iCloud. If you're signed in, tap Sign Out.
- Log in using your new test credentials (see Creating a sandbox tester account).
- Tap Back to go back to the first page of the Settings app.
- Tap Wallet & Apple Pay.
- Tap Add Credit or Debit Card. You'll be prompted to photograph your card. Tap Enter Card Details Manually instead.
- Enter one of the test cards listed above.
Working with Payment Requests
This section is intended for merchants not using our iOS SDK. Note that we recommend using our iOS SDK to get up-and-running quickly and to offer your shoppers Apple Pay, PayPal, and credit and debit cards in your app.
We'll cover some key topics in working with payment requests, including what information is required in the payment request, as well as how to send the payment token data to BlueSnap to complete a transaction.
If you want to use surcharging with Apple Pay, you will need to call BlueSnap's Calculate Surcharge API and update the transaction amount to include the surcharge fee before processing payment. Refer to Surcharge with Apple Pay for more information.
Creating payment requests
Once you're ready to create a payment request, you'll need to include the necessary information to ensure BlueSnap can properly complete the transaction.
If you would like to learn more about the setup process for creating payment requests, refer to Apple's documentation.
BlueSnap requires the following information in the payment request to complete a transaction:
For a complete list of supported properties, click here.
| Payment API | Extended Payment API |
|---|---|
|
|
Sending payment token data to BlueSnap
Once you have the shopper's authorization, you're on your way to sending payment token data to BlueSnap for processing.
If you would like to learn more about the payment authorization process before moving forward, visit Apple's documentation.
The payment token is an instance of the PKPaymentToken class, and has a nested structure. The encrypted payment data that you send to BlueSnap for processing must be extracted from this structure, then wrapped in an intermediate object that BlueSnap recognizes.
The paymentData property of your payment token is a JSON dictionary, and it contains a data key. The value of this data key contains the encrypted payment data that you'll send to your server. After you have sent the encrypted payment data to your server, you must include it in the request when you send to BlueSnap for processing. Depending on BlueSnap's response, you'll return an appropriate response in the completion handler (i.e. success, failure, etc.).
For more information
- Apple Pay Within Apps presentation from WWDC 2015
- Emporium: A Simple Shopping Experience with Apple Pay
Code sample
Important!
- The intermediate object (encodedPaymentToken) should look exactly like the sample below and contain the same information about billing and shipping (you do not need to include the additional fields).
- The BlueSnap iOS SDK is open source and contains our own Apple Pay implementation (similar to the code sample (for the relevant parts)).
- You only receive the
paymentDatakey that contains the pkpaymentData from Apple Pay.
/* PKPaymentAuthorizationControllerDelegate conformance. */
extension PaymentHandler: PKPaymentAuthorizationControllerDelegate {

    func paymentAuthorizationController(_ controller: PKPaymentAuthorizationController, didAuthorizePayment payment: PKPayment, completion: @escaping (PKPaymentAuthorizationStatus) -> Void)
    {
        // Perform some very basic validation on the provided contact information
        if payment.shippingContact?.emailAddress == nil || payment.shippingContact?.phoneNumber == nil {
            paymentStatus = .invalidShippingContact
        } else {
            // Here you would send the payment token to your server or payment provider to process
            // Once processed, return an appropriate status in the completion handler (success, failure, etc)          This is just a sample code that decodes the token and reconstruct it.  You should add some validations and make sure you pick up the information you need.

            NSLog("Now calling BS with PKPayment:")
            /
            do  {
                let token: PKPaymentToken = payment.token
                let amount = paymentSummaryItems.last?.amount
                let currency = paymentRequest.currencyCode
                let pkpaymentData = try JSONSerialization.jsonObject(with: token.paymentData, options: JSONSerialization.ReadingOptions())
				var billingAddressLines = [String]()
				billingAddressLines.append("")
				if (payment.billingContact?.postalAddress?.street != nil) {
					billingAddressLines.append(payment.billingContact!.postalAddress!.street)
				}
                let encodedPaymentToken = [
                    "billingContact":  [
                        "emailAddress" : payment.billingContact?.emailAddress,
						"country": payment.billingContact?.postalAddress?.country ?? "",
                        "phoneNumber": payment.billingContact?.phoneNumber?.stringValue,
                        "addressLines": billingAddressLines                    ],
                    "shippingContact": [
                        "emailAddress": payment.shippingContact?.emailAddress,
                        "phoneNumber": payment.shippingContact?.phoneNumber?.stringValue
                    ],

                    "token": [
                        "transactionIdentifier": token.transactionIdentifier,
                        "paymentData" : pkpaymentData,
                        "paymentMethod" : [
                            "displayName": token.paymentMethod.displayName ?? "unkown",
                            "network": token.paymentMethod.network?._rawValue ?? "unknown" ,
                            "type": "debit",
                        ],
                    ]
                ] as [String : Any]

                let encodedPaymentTokenJson  = try JSONSerialization.data(withJSONObject: encodedPaymentToken, options: JSONSerialization.WritingOptions())
                let base64EncodedPaymentToken = String(data: encodedPaymentTokenJson, encoding: .utf8)!.data(using: String.Encoding.utf8)!.base64EncodedString()
                let body = [
                            "amount": amount,
                            "currency": currency,
                            "wallet": [
                                "applePay" : [
                                    "encodedPaymentToken": base64EncodedPaymentToken
                                    ]
                                ]
                           ] as [String : Any]

                let httpBody  = try JSONSerialization.data(withJSONObject: body, options: JSONSerialization.WritingOptions())
                print(String(data: httpBody, encoding: .utf8))
                let loginData = String(format:  "%@:%@","user", "password").data(using: String.Encoding.utf8)!
                let base64LoginString = loginData.base64EncodedString()

                var request = URLRequest(url: URL(string: "https://[Merchant server]")!)
                request.httpMethod = "POST"

                request.httpBody = httpBody
                request.setValue("Basic \(base64LoginString)", forHTTPHeaderField: "Authorization")
                request.addValue("application/json", forHTTPHeaderField: "Content-Type")
                request.addValue("application/json", forHTTPHeaderField: "Accept")
                let task = URLSession.shared.dataTask(with: request) { data, response, error in
                    guard let data = data, error == nil else {
                        NSLog("Network error")
                        return
                    }

                    NSLog(response!.debugDescription)
                    if let httpResponse = response as? HTTPURLResponse {
                        NSLog("statusCode: \(httpResponse.statusCode)")
                        if httpResponse.statusCode == 200 {
                            self.paymentStatus = .success
                        }
                        else {
                            self.paymentStatus = .failure
                        }
                    }
                    completion(self.paymentStatus)
                }
                task.resume()

            }
            catch {
               NSLog("json error")
            }

        }
    }
As demonstrated in the code sample below, you need to generate an intermediate object (encodedPaymentToken) in the appropriate way that the BlueSnap server expects it, with the Apple Pay info embedded:
var billingAddressLines = [String]()
billingAddressLines.append("")
if (payment.billingContact?.postalAddress?.street != nil) {
	billingAddressLines.append(payment.billingContact!.postalAddress!.street)
}
let encodedPaymentToken = [
                    "billingContact":  [
                        "emailAddress" : payment.billingContact?.emailAddress,
						"country": billingContact?.postalAddress?.country ?? "",
                        "phoneNumber": payment.billingContact?.phoneNumber?.stringValue,
                        "addressLines": billingAddressLines                    ],
                    "shippingContact": [
                        "emailAddress": payment.shippingContact?.emailAddress,
                        "phoneNumber": payment.shippingContact?.phoneNumber?.stringValue
                    ],

                    "token": [
                        "transactionIdentifier": token.transactionIdentifier,
                        "paymentData" : pkpaymentData,
                        "paymentMethod" : [
                            "displayName": token.paymentMethod.displayName ?? "unkown",
                            "network": token.paymentMethod.network?._rawValue ?? "unknown" ,
                            "type": "debit",
                        ],
                    ]
                ]
Processing Transactions
This section covers how to send the payment token data to BlueSnap to process the transaction using the Payment API or the Extended Payment API.
Processing transactions with the Payment API
The payment token data is sent in the Encoded Payment Token property in the request.
Scenario 1: Shopper is new
For sales involving new shoppers, include the Encoded Payment Token property in an Auth Only, Auth Capture, or Create Subscription request.
Sample Auth Capture request with Apple Pay wallet:
curl -v -X POST https://sandbox.bluesnap.com/services/2/transactions \
-H 'Content-Type: application/json' \
-H 'Accept: application/json' \
-H 'Authorization: Basic dXNlcm5hbWU6cGFzc3dvcmQ=' \
-d '
{
    "cardTransactionType": "AUTH_CAPTURE",
    "softDescriptor": "DescTest",
    "amount": 11.00,
    "currency": "USD",
    "wallet": {
      "walletType": "APPLE_PAY",
        "encodedPaymentToken": "ImRhdGEiOiJuY1AvRitIUy8zeG5bXhCMFd"
    }
}'
curl -v -X POST https://sandbox.bluesnap.com/services/2/transactions \
-H 'Content-Type: application/xml' \
-H 'Accept: application/xml' \
-H 'Authorization: Basic dXNlcm5hbWU6cGFzc3dvcmQ=' \
-d '
<card-transaction xmlns="http://ws.plimus.com">
<card-transaction-type>AUTH_CAPTURE</card-transaction-type>
<soft-descriptor>DescTest</soft-descriptor>
<amount>11.00</amount>
<currency>USD</currency>
<wallet>
<wallet-type>APPLE_PAY</wallet-type>
<encoded-payment-token>ImRhdGEiOiJuY1AvRitIUy8zeG5bXhCMFd</encoded-payment-token>
</wallet>
</card-transaction>'Scenario 2: Shopper is returning
For sales involving returning shoppers, include the shopper's Vaulted Shopper ID and Encoded Payment Token in the Auth Capture, Auth Only, or Create Subscription request. Keep in mind, a shopper can only be vaulted with Apple Pay after a payment has been made.
Sample Auth Capture request with vaulted shopper and Apple Pay wallet:
curl -v -X POST https://sandbox.bluesnap.com/services/2/transactions \
-H 'Content-Type: application/json' \
-H 'Accept: application/json' \
-H 'Authorization: Basic dXNlcm5hbWU6cGFzc3dvcmQ=' \
-d '
{
   "cardTransactionType": "AUTH_CAPTURE",
    "softDescriptor": "DescTest",
    "amount": 11.00,
    "currency": "USD",
    "vaultedShopperId": 1234,
    "wallet": {
      "walletType": "APPLE_PAY",
      "encodedPaymentToken": "ImRhdGEiOiJuY1AvRitIUy8zeG5bXhCMFd"
    }
}'
curl -v -X POST https://sandbox.bluesnap.com/services/2/transactions \
-H 'Content-Type: application/xml' \
-H 'Accept: application/xml' \
-H 'Authorization: Basic dXNlcm5hbWU6cGFzc3dvcmQ=' \
-d '
<card-transaction xmlns="http://ws.plimus.com">
<card-transaction-type>AUTH_CAPTURE</card-transaction-type>
<soft-descriptor>DescTest</soft-descriptor>
<amount>11.00</amount>
<currency>USD</currency>
<vaulted-shopper-id>1234</vaulted-shopper-id>
<wallet>
<apple-pay>
<encoded-payment-token>ImRhdGEiOiJuY1AvRitIUy8zeG5bXhCMFd</encoded-payment-token>
</apple-pay>
</wallet>
</card-transaction>'For more information
- Auth Capture: Refer to JSON or XML
- Auth Only: Refer to JSON or XML
- Create Subscription: Refer to JSON or XML
Note: Apple Pay only supports single partial capture.
Working with subscriptions or surcharges?
Check out BlueSnap's Subscription guide: JSON or XML
If using surcharging, you will need to provide the surcharge token obtained from the Calculate Surcharge API request in the Auth Capture call. This is required even if the transaction was not eligible for surcharge.
Processing Transactions with the Extended Payment API
The payment token data is sent in the encoded-payment-token property in the request.
Scenario 1: Shopper is new
For sales involving new shoppers, include encoded-payment-token in the Create Order and New Shopper or Create Shopping Context request.
Sample Create Order and New Shopper request with Apple Pay:
curl -v -X POST https://sandbox.bluesnap.com/services/2/batch/order-placement \
-H 'Content-Type: application/xml' \
-H 'Authorization: Basic dXNlcm5hbWU6cGFzc3dvcmQ=' \
-d '
<batch-order xmlns="http://ws.plimus.com">
  <order>
    <ordering-shopper>
      <web-info>
        <ip>62.219.121.253</ip>
        <remote-host>www.merchant.com</remote-host>
        <user-agent>Mozilla/5.0 (Linux; X11)</user-agent>
      </web-info>
      <wallet>
      	<apple-pay>
      		<encoded-payment-token>eyAgDQogICAidG9rZW4iOnsgIA0KICAgICAgInBheW1lbnREYXRhIjp7ICANCiAgICAgICAgICJkYXRhIjoic1VpSnkxanlWeDFEOEluWWJFUFFRYjFSNTdGazN4QUFBQUFBQUEiLA0KICAgICAgICAgImhlYWRlciI6eyAgDQogICAgICAgICAgICAicHVi==</encoded-payment-token>
      	</apple-pay>
      </wallet>
    </ordering-shopper>
    <cart>
      <cart-item>
        <sku>
          <sku-id>2186654</sku-id>
        </sku>
        <quantity>1</quantity>
      </cart-item>
    </cart>
    <expected-total-price>
      <amount>260.00</amount>
      <currency>USD</currency>
    </expected-total-price>
  </order>
</batch-order>'
Scenario 2: Shopper is returning
For sales involving returning shoppers, include encoded-payment-token and shopper-id in the Create Order with Existing Shopper or Create Shopping Context request.
Sample Create Order with Existing Shopper request with Apple Pay:
curl -v -X POST https://sandbox.bluesnap.com/services/2/orders \
-H 'Content-Type: application/xml' \
-H 'Authorization: Basic dXNlcm5hbWU6cGFzc3dvcmQ=' \
-d '
<order xmlns="http://ws.plimus.com">
  <ordering-shopper>
    <shopper-id>19575996</shopper-id>
    <web-info>
      <ip>62.219.121.253</ip>
      <remote-host>www.merchant.com</remote-host>
      <user-agent>Mozilla/5.0 (Linux; X11)</user-agent>
    </web-info>
     <wallet>
	   <apple-pay>
		   <encoded-payment-token>ImRhdGEiOiJuY1AvRitIUy8zeG5bXhCMFd</encoded-payment-token>
   	   </apple-pay>
     </wallet>
  </ordering-shopper>
  <cart>
    <cart-item>
      <sku>
        <sku-id>2152762</sku-id>
      </sku>
      <quantity>1</quantity>
    </cart-item>
  </cart>
  <expected-total-price>
    <amount>15.00</amount>
    <currency>USD</currency>
  </expected-total-price>
</order>'Working with subscriptions?
Check out our Subscriptions Guide.